Websites can attract a lot more visitors if they are properly localized (translated). You have the original content and the translations; but, the website still needs to be programmed. Here, in a couple of steps we will see how to do that:
STEP 0: Requirements
You will need:
- To find your password and username for your FTP accounts
- To have a server that can parse PHP files (most of them do, ex: Apache, IIS)
- Basic HTML knowledge, you can learn a little here if you need to: http://www.w3schools.com/html/default.asp
STEP 1: The files
Make sure you have access to your website files. You will need to download them from your server using FTP/SFTP if they are already created.
If you do not know how to access your files using FTP, you will have to download a program in order to do so:
Choose your operating system and download: https://filezilla-project.org/download.php?type=client
You will need:
- Your password
- Your username
- Port: 21 (usually) or 22 (for SFTP)
- Server address: your website address
STEP 2: The language selector
If you have an header or footer file you can add this code here, otherwise you will need to add it to every page or create a header or footer file. We are going to add a basic language selector in html with some Javascript in it:
The code
<form>
<select onchange=”window.location.href= this.form.URL.options[this.form.URL.selectedIndex].value” name=”URL”>
<option>Select language</option>
<option value=”mypage1.php?lan=EN”>English</option>
<option value=”mypage1.php?lan=ES”>Español</option>
<option value=”mypage1.php?lan=FR”>Français</option>
</select>
</form>
As you can see, we are not creating new pages for each language, we are just going to switch the content, but leave everything else the same.
What does this code mean?
- <option value=”mypage1.php?lan=EN”>English</option> This is the option that gets selected, this symbol –>?<– indicates that the current content language (lan) is going to be in english (EN) or french (FR) or spanish (ES). Just add more options ( <option value=”mypage1.php?lan=XX”>My language</option>) if you need to add more languages.
- <select onchange=”window.location.href= this.form.URL.options[this.form.URL.selectedIndex].value” name=”URL”> This means that when the “select” is clicked on, it is going to redirect to this same page (window.location.href) –> This is telling it where to go and this –> this.form.URL.selectedIndex].value is just extracting the language code (EN) or (FR). After it gets the code it redirects to the same page with the diferent language code.
STEP 3: Preparing the content
Now that we have our selector we need our content. For simplicity, we are going to create a file for each language. Each file will have all the text and content for that language.
- For example, we are going to create three files called (lan_en.php), (lan_es.php) and (lan_fr.php) and place them inside a folder called (_incl) in the same directory as our index file.
- Then again, in each file you will need to add this:
The code
<?php
require(‘_incl/lan_en.php’);
require(‘_incl/lan_es.php’);
require(‘_incl/lan_fr.php’);
?>
What does this code mean?
- require(‘_incl/lan_en.php’):We are loading the file called lan_en.php located in _incl/lan_en.php.
- <?php: We are adding a php code to the html page, and ?> is where the php code ends
Step 4: Create the content files
Once we have created our language content files we are going to start adding text and content.
The code
The english content file (lan_en.php):
<?php
//Content common to all pages
$TEXT_EN[‘services’] = ‘services’;
//Index content
$TEXT_EN[‘our website’] = ‘Our website’;
//Page1 content
$TEXT_EN[‘about’] = ‘About’;
?>
The spanish content file (lan_es.php):
<?php
//Content common to all pages
$TEXT_ES[‘services’] = ‘servicios’;
//Index content
$TEXT_ES[‘our website’] = ‘Nuestra página’;
//Page1 content
$TEXT_ES[‘about’] = ‘Acerca de’;
?>
What does this code mean?
- We are replacing the actual text of the page with a variable.
- Each language has a variable ($TEXT_ES, $TEXT_EN), so they can be easily located.
- Variables are identified by the dollar $ sign in front of them
- We are creating an array, in which we are going to put all content. More information about arrays: http://www.w3schools.com/php/php_arrays.asp
- To add more content just add another line with the variable, description and content: $TEXT_ES[‘Content description’] = ‘content’;
- The content description is an array index, so it does not change between languages only the content and the variable do.
Step 5: What is the current language?
So, we have our files and part of the code, we will need to find our which content we are going to show. In order to do that we have to know what language what selected by the user. We will:
- Add a piece of code that extracts that information
- Prepare the content variables
The code
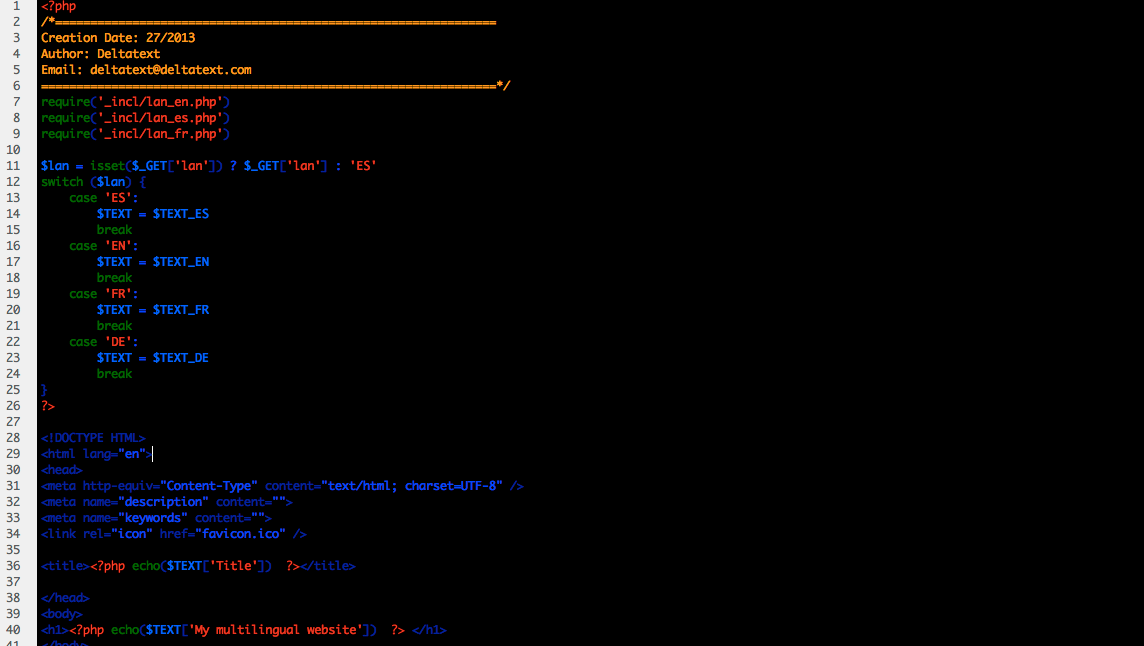
<?php
$lan = isset($_GET[‘lan’]) ? $_GET[‘lan’] : ‘ES’;
switch ($lan) {
case ‘ES’:
$TEXT = $TEXT_ES;
break;
case ‘EN’:
$TEXT = $TEXT_EN;
break;
case ‘FR’:
$TEXT = $TEXT_FR;
break;
case ‘DE’:
$TEXT = $TEXT_DE;
break;
}
?>
What does this code mean?
- $lan = isset($_GET[‘lan’]) ? $_GET[‘lan’] : ‘EN’; Extract the language code, if there isn’t any, assume it is the default one (EN) (English) and save it to a variable called “lan”.
- case ‘ES’: $TEXT = $TEXT_ES; … This is just normalizing variable names for step 6, if you add languages you need to add a “case” too. For more info about cases: http://www.w3schools.com/php/php_switch.asp
Step 6: Add variables and we are done!
Finally, replace your text (inside your html/php/asp… file) with the variables we just created:
The code before example
<section>
<h2>Services</h2>
<p>Our website</p>
</section>
The code after example
<section>
<h2><?php echo($TEXT[‘services’]); ?></h2>
<p><?php echo($TEXT[‘Our website’]); ?></p>
</section>
I hope this tutorial was useful and that you will achieve your desired results.
We offer discounts for website programming when translations are done with us.